

Adding Detail To Subdivision Surface Models
Working with subdivision surfaces is really wonderful because they allow you to just add detail where you need it. You can step up the mesh detail only in the areas you need more geometry; like the hands and feet, and then fall off to a lower resolution as you reach the arm/leg. A lot of this revolves around the placement of special 'pole' polygons, which I will explain here.
Pole Polygons
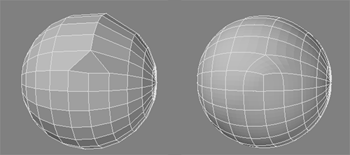 Pole polygons are 4 sided polygons that increase/decrease the resolution of the mesh. In this example you can see how the overall surface has not changed at all, but it's resolution has been lowered considerably with the insertion of a 4 sided polygon that, in effect, sews up two bands of polys.
However, poles should stay away from deforming parts of the mesh. For the most part you do not want a multi-vert point being included in any deformations. When I say 'multi-vert' here, I mean points with more than the normal 4 vertices, some people call them 'stars'. That said, they are still great for upping resolution for use in deformable areas, places like the top of the hand/foot. Sometimes, depending onthe subdivision algorithm, there may be artifacts generated around multi-vert points, these may look odd, but you can see when you tesselate or subdivide the mesh that they will not exist in the render.
 Here is a good example of using this technique to increase resolution moving out towards the fingers. This allows you to ramp up the resolution along the top and bottom of the hand, where there isn't really much deformation at all, so that by the time you get to the fingers you have the exact amount of geometry you want. Using this technique, you really have to think about the placement of each polygon, and it's used a lot by people who build meshes a poly at a time, or extend edges out to generate their models.
There are scripts that will create two new strips of geometry from a selected row of points, or an edge; capping both ends with pole polygons. The plugin for Lightwave is called FI's Wrinkle. I haven't been able to find a script like this for Maya, (Although Byron's PolyTools' 'SmartSplit' can achieve something almost like it) and have started making my own, check back here later for more info.
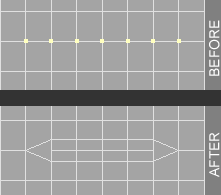 This is a good but simple example of what the script should do, although it follorw the surface of the mesh. This way, you can be modeling very low res, and decide that you need to increase resolution to just one part of the object --on the fly. And best of all, the surface is still a very clean, compliant subd mesh. In FI's Wrinkle, dragging on mouse X widens the cuts along the band, and moving up/down on the mouse Y moves the newly created inner points up/down along the normals of the surrounding polys: It's a great tool!
 Here is the wire of Geri, from Pixar's famed short Geri's Game. It is a bit high res for my liking in areas like the top of the head, but I believe they created it from tracing an actual maquette. Anyhow, you can see how they use pole polys to add details like wrinkles and creases to the geometry. These wrinkles can even be flush areas that you will later use to add creases with morphs etc... As you can see, they have a fair amount of triangles, I would tell anyone except Pixar to stay away from triangles or n-gons, quads work the best. Catmull-Clark does support n-gons, and this is great when dealing with inorganic items like capping cylinders, but it's generally not a great idea for deformable characters. As a general rule of thumb you need to understand that Pixar knows what they're doing and their modeling/animation system is proprietary; leave it at that. The ocaissional triangle is ok, and for a while it will be hard to make a really low res, clean mesh, without having to resort to one from time to time. What you need to understand is that you should _never_ put them in deforming areas; still just try to never use them.
Here are some other examples of places I have used pole polys to add detail, drop me a line i you have any questions about anything here, I have colored in the areas to make them easier to differentiate:


