Stumbling Toward 'Awesomeness'

A Technical Art Blog

Monday, November 13, 2017

The Mighty Message Attribute

I recently had a discussion about storing relationships in Maya, and hadn’t realized the role of the message attribute wasn’t this universally cherished thing. In previous posts entitled ‘Don’t use string paths‘, or ‘Why Storing String Refs is Dangerous and Irresponsible‘ I outlined why this is the devil’s work, but in those posts I talked about the API, PyMel and Message Attrs. I didn’t really focus on why message attrs were so important: they serialize node relationships.

For quite some time I have advocated storing relationships with message attrs. At the Maya SIGGRAPH User Event, when they asked me to speak about our modular rigging system, I kind of detailed how we leveraged those at Crytek in CryPed.

msg

I am not quite sure when I started using message attrs to convey relationships, I’m no brainiac, it could have been after seeing this 2003 post from Jason Schleifer on CGTalk:

image

Or maybe I read it in the Maya docs (unlikely):

“Message attributes only exist to formally declare relationships between nodes. By connecting two nodes via message attributes, a relationship between those nodes is expressed.”

So why does Maya use this, and why should I?

As you read in the docs above, when Maya wants to declare a relationship between a camera and image plane, they do so with a message attribute that connects them. This is important because this bond won’t be broken if the plane or it’s parent is renamed. As soon as you store the string path to a node in the DAG, that data is already stale.  It’s no longer valid.  When you query a message attribute, Maya returns the item, it’s DAG path will be valid, regardless of hierarchy or name changes.

Jason’s example above is maybe the most simple, in my image (a decade later) you can see the messages declaring many relationships abstracting the character at three main levels of interface, Character, ChatacterPart and RigPart. I talked about the basic ideas here in a 2013 post about object oriented python in Maya.

Though Rob vigorously disagreed in the comments there, I am still doing this today.  Here’s an example from the facial code we released in EPIC’s ARTv1 rigging tools some time ago. The face is abstracted on two levels, the ‘face’ and the ‘mask’, here I am only displaying the message connecting them:

wiring

By using properties as described in that previous blog post, below I am accessing the system, creating a face instance, walking down the message connection to the mask node, and then asking it for the attach locations. It’s giving me these transforms, by querying the DAG, live:

msg

So, that property looks like this:

    @property
    def attachLocations(self):
        return cmds.listConnections(self.node + '.attachLocations')
    @attachLocations.setter
    def attachLocations(self, locs):
        for loc in locs:
            utils.msgConnect(self.node + '.attachLocations', loc + '.maskNode')

Setting the attach locations through python would look like this, and it would rebuild the message attrs:

face.mask.attachLoactions = ['myLoc1', 'myLoc2']

Working like this, you have to think hard about what a rigger would want to access at what level and expose what’s needed. But in the end, as you see, through python, you have access to everything you need, and none of the data is stale.

How and when to use strings

There are times when the only way you can store a relationship is by using a string in some fashion. Here are some situations and how I have handled them in the past, feel free to leave a comment with your experiences.

  • Maya can’t store a relationship to something that doesn’t exist (has been deleted). It can’t store a relationship when it’s not open. In these situations, instead of storing the name in an attr, I stamp the two nodes with a string attr to store the relationship, then you query the world for another node with a matching stamped attr.
  • Many times you need to feed your class an initial interface node to build/wrap. Instead of feeding it a string name, you can query the world for node type, in the Ryse example above, the rigging and animation tools could query cmds.ls(type=’CryCharacter’), this would return all characters in the scene. This means all rigging and animation tools needed a common ‘working character’ combobox at the top to define the character the tool is operating on. If you don’t have a node type, you can use a special string attr to query for.
  • Sometimes you’re like saving joint names to serialize skinning data or something. You can use message attrs to play it safe here as well. Some pseudocode: For character in characters, if character identifier matches file on disk, for mesh in character.meshes if mesh in file skin it. For joint in character.joints if in file, add them to the skincluster, etc. Here you’re validating all your serialized string data against your class which is traversing the DAG live.
  • Message attrs can get SLOW if you’re tracking thousands of items, you should only be tracking important things you would want later. In CryPed, when we wanted to track all nodes that were created when a module was built, we would stamp them all with a string attr that was the function name that built the module. To track this kind of data HarryZ at Crytek had the pragmatic idea of just doing a global ls of the world when a buildout started and then one at the end and boolean them out, this caught all the intermediate and utility nodes and everything generated by the rigging code.
posted by Chris at 6:10 AM  

Tuesday, October 25, 2016

Skin Save/Load Tool

deformerweightsplus

Some had asked me to package the previous code together into a tool. I was reluctant because there were many situations where it just didn’t work. I made something to aid a discussion on the beta forum.

However, accidentally, I seem to have the code working. It’s odd, but the solution to skinClusters not being paintable after deformerWeights was used to load them was to try and make another skinCluster (which errors, but fixes the Artisan issue).

I have tossed this on GitHub here:
https://github.com/chrisevans3d/deformerWeightsPlus/


posted by Chris at 10:46 AM  

Monday, September 26, 2016

Save/Load SkinWeights 125x Faster

DISCLAIMER/WARNING: Trying to implement this in production I have found other items on top of the massive list that do not work. The ignore names flag ‘ig’ causes a hard crash on file load, the weight precision flag ‘wp’ isn’t implemented though it’s documented, the weight tolerance flag ‘wt’ causes files to hang indefinitely on load. When it does load weights properly, it often does so in a way that crashes the Paint Skin Weights tool. I have reported this in the Maya Beta forums.

Previously I discussed the promise in Maya command ‘deformerWeights‘. The tool that ships with Maya was not very useful, but the code it called was 125 times faster than python if you used it correctly..

Let’s make a python class that can save and load skin weights. You hand it a few hundred skinned meshes (avg Paragon character) and it saves the weights and then you delete history on the meshes, and it loads the weights back on.  What I just described is the process riggers go through when updating a rig or a mesh _every day_.

Below we begin the class, we import a python module to parse XML, and we say “if the user passed in a path, let’s parse it.”

#we import an xml parser that ships with python
import xml.etree.ElementTree
 
#this will be our class, which can take the path to a file on disk
class SkinDeformerWeights(object):
    def __init__(self, path=None):
        self.path = path
 
        if self.path:
            self.parseFile(self.path)

Next, let’s make this parseFile function. Why is parsing the file important? In the last post we found out that there’s a bug that doesn’t appropriately apply saved weights unless you have a skinCluster with the *exact* same joints as were exported. We’re going to read the file and make a skinCluster that works.

#the function takes a path to the file we want to parse
def parseFile(self, path):
    root = xml.etree.ElementTree.parse(path).getroot()
 
    #set the header info
    for atype in root.findall('headerInfo'):
        self.fileName = atype.get('fileName')
 
    for atype in root.findall('weights'):
        jnt = atype.get('source')
        shape = atype.get('shape')
        clusterName = atype.get('deformer')

Now we’re getting some data here, we know that the format can save deformers for multiple shapes, let’s make a shape class and store these.

class SkinnedShape(object):
    def __init__(self, joints=None, shape=None, skin=None, verts=None):
        self.joints = joints
        self.shape = shape
        self.skin = skin
        self.verts = verts

Let’s use that when we parse the file, let’s then store the data we paresed in our new shape class:

#the function takes a path to the file we want to parse
def parseFile(self, path):
    root = xml.etree.ElementTree.parse(path).getroot()
 
    #set the header info
    for atype in root.findall('headerInfo'):
        self.fileName = atype.get('fileName')
 
    for atype in root.findall('weights'):
        jnt = atype.get('source')
        shape = atype.get('shape')
        clusterName = atype.get('deformer')
 
        if shape not in self.shapes.keys():
            self.shapes[shape] = self.skinnedShape(shape=shape, skin=clusterName, joints=[jnt])
        else:
            s = self.shapes[shape]
            s.joints.append(jnt)

So now we have a dictionary of our shape classes, and each knows the shape, cluster name, and all influences. This is important because, if you read the previous post, the weights will only load onto a skinCluster with the exact same number and names of joints.
Now we write a method to apply the weight info we parsed:

def applyWeightInfo(self):
    for shape in self.shapes:
        #make a skincluster using the joints
        if cmds.objExists(shape):
            ss = self.shapes[shape]
            skinList = ss.joints
            skinList.append(shape)
            cmds.select(cl=1)
            cmds.select(skinList)
            cluster = cmds.skinCluster(name=ss.skin, tsb=1)
            fname = self.path.split('\\')[-1]
            dir = self.path.replace(fname,'')
            cmds.deformerWeights(fname , path = dir, deformer=ss.skin, im=1)

And there you go. Let’s also write a method to export/save the skinWeights from a list of meshes so we never have to use the Export DeformerWeights tool:

def saveWeightInfo(self, fpath, meshes, all=True):
    t1 = time.time()
 
    #get skin clusters
    meshDict = {}
    for mesh in meshes:
        sc = mel.eval('findRelatedSkinCluster '+mesh)
        #not using shape atm, mesh instead
        msh =  cmds.listRelatives(mesh, shapes=1)
        if sc != '':
            meshDict[sc] = mesh
        else:
            cmds.warning('>>>saveWeightInfo: ' + mesh + ' is not connected to a skinCluster!')
    fname = fpath.split('\\')[-1]
    dir = fpath.replace(fname,'')
 
    for skin in meshDict:
        cmds.deformerWeights(meshDict[skin] + '.skinWeights', path=dir, ex=1, deformer=skin)
 
    elapsed = time.time()-t1
    print 'Exported skinWeights for', len(meshes), 'meshes in', elapsed, 'seconds.'

You give this a folder and it’ll dump one file per skinCluster into that folder.
Here is the final class we’ve created [deformerWeights.py], and let’s give it a test run.

sdw = skinDeformerWeights()
sdw.saveWeightInfo('e:\\gadget\\', cmds.ls(sl=1))
>>>Exported skinWeights for 214 meshes in 2.433 seconds.

Let’s now load them back, we will iterate through the files in the directory and parse each, applying the weights:

import os
t1=time.time()
path = "e:\\gadget\\"
files = 0
for file in os.listdir(path):
    if file.endswith(".skinWeights"):
        fpath = path + file
        sdw = skinDeformerWeights(path=fpath)
        sdw.applyWeightInfo()
        files += 1
elapsed = time.time() - t1
print 'Loaded skinWeights for', files, 'meshes in', elapsed, 'seconds.'
>>> Loaded skinWeights for 214 meshes in 8.432 seconds.

“>>> Loaded skinWeights for 214 meshes in 8.432 seconds.”

So that’s a simple 50 line wrapper to save and load skinWeights using the deformerWeights command. No longer do we need to write C++ API plugins to save/load weights quickly.

posted by Chris at 1:27 AM  

Saturday, September 24, 2016

DeformerWeights Command, Cloaked Savior?

export-skin

This post was originally going to be entitled ‘Why Everyone Writes their Own Skin Exporter’. Maya’s smooth skin weight export tool hasn’t changed since Maya 4.0 when it was introduced 15 years ago. It saves out greyscale weightmaps in UV space, one image per joint influence per mesh. The only update they have done in 15 years is change the slider to go from a max of 1024 pixels to 4096, and now 8192!

Autodesk understands the need and importance of a skin weight exporter, they even ship it as a C++ example in their Maya Developer Kit / SDK. So why are they still shipping this abomination above?

got-this

Like blind data discussed before, in pythonland we cannot set skinweights in one go, we must iterate through the entire mesh setting skin weights one vertex at a time. This means a Maya feature or C++ plugin can save and load skin weights in seconds that take python 15 minutes.

I have written lots of skin weight save/load crap in my time, and as I sat down and started to do that very thing in an instructional blog post one night, we had an interesting discussion in the office the next day. ADSK added ‘Export Deformer Weights‘ in 2011, but it has never really worked. I don’t know a single person who uses it. But it does save and load ‘deformer’ weights via the C++ API –so there’s real promise here!


44521502

Save/load skin weights fast without writing a custom Maya plugin? This is kinda like the holy grail, which is ridiculous, but you should see the lengths people go to eek out a little more performance! My personal favorite was MacaroniKazoo back in 2010 reaching in and setting the skinCluster weight list directly by hand using an unholy conglomeration of python API and MEL commands. Tyler Thornock has a post that builds on this here.

So I asked the guys if anyone had looked at Export Deformer Weights recently, everyone either hadn’t heard of it, heard it was shit, or had some real first-hand experience of it being “A bit shit.” But still –the promise was there!

Export Deformer Weights: Broken and Backwards

So, first thing’s first, I made an awesome test case. I am going to go over all the gotchas and things that are broken, but if you don’t want to take this voyage of discovery, skip this section.

skin01

I open the deformer weight export tool, and just wow.. I mean the UI team really likes it’s space:

export-def1

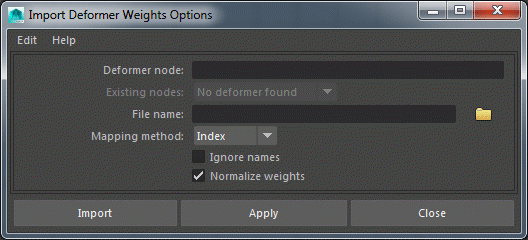
I save my skin weights to an XML file, delete history on the mesh, and open the import UI:

export-def2

Gotcha 1) It requires a deformer to load weights onto. You need to re-skin your mesh.

I re-skinned my mesh and loaded the XML using Index.. drumroll..

skin02

Well, this is definitely not applying the weights back by vertex index. I decided to try ‘Nearest’:

skin03

Gotcha 2) Of the options [Index, Nearest, Over], ‘Index’ is somehow lossy, and anything other than ‘Index’ seems to crash often, ‘Nearest’ seems totally borked. (above)

So this was when I just began to think this was a complete waste of my time. I was pretty annoyed that they even shipped a tool like this, something that is so needed and so important, yet crashes frequently and completely trashes your data when it does work.

this-is-fine

Not Taking ‘Broken and Backwards’ for an Answer

I am already invested and, not understanding how loading weights by point index could be lossy and broken, I decided to look at the XML file. The tool writes out one XML file per skinCluster, here’s a rundown of the file format:

Mesh Info (Shape) – the vertices of the shape are stored local space x,y,z and corresponding index

<?xml version="1.0"?>
<deformerWeight>
  <headerInfo fileName="C:/Users/chris.evans/Desktop/test_sphere.xml" worldMatrix="1.000000 0.000000 0.000000 0.000000 0.000000 1.000000 0.000000 0.000000 0.000000 0.000000 1.000000 0.000000 0.000000 0.000000 0.000000 1.000000 "/>
  <shape name="pSphereShape1" group="7" stride="3" size="382" max="382">
    <point index="0" value=" 0.148778 -0.987688 -0.048341"/>
    <point index="1" value=" 0.126558 -0.987688 -0.091950"/>
    <point index="2" value=" 0.091950 -0.987688 -0.126558"/>
    ...

Joints (Weights) – There is one block per joint that calls out each vertex that it have influences for on the shape

  <weights deformer="skinCluster1" source="root" shape="pSphereShape1" layer="0" defaultValue="0.000" size="201" max="380">
    <point index="0" value="0.503"/>
    <point index="1" value="0.503"/>
    <point index="2" value="0.503"/>
    ...

And that’s it, not a lot of data, nothing about the skinCluster attributes or options, no support for spaces like UV or world. (odd, since it’s had UV support for 15 years)

Next I decided to run the tool again and see what command it was calling, I then looked up the command documentation and here’s where it gets interesting, go ahead, take a look!

def_bary

So now I am hooked, someone is putting some thought into this –at least on some level.

image

I don’t at all understand why the UI has none of these options, but I need to get this working. If you read through the docs, the command also supports:

  • Exporting multiple skinClusters/shapes/deformers per XML file
  • Exporting skinCluster/deformer attributes like ‘skinningMethod’ and ‘envelope’
  • Local and world space positions with a positional tolerance

“Someone is putting some thought into this”

So I started trying to figure out why a file format that explicitly knows every influence of every vertex by index and inf name, doesn’t load weights properly. After some trials I hit gotcha #3:

Gotcha 3) Of the options the weights only load properly if the skinCluster has the *exact* same influences it was saved with. Which really makes no sense, because the file format has the name of every joint in the old skinCluster.

So now I had it working, time to wrap it and make it useful.

The Documentation is a Lie.

So, first thing’s first, I did a speed test.

Importing with deformerWeights was about 125 times faster: Gold mine.

But I just couldn’t get some of the flags to work, I thought I was just a moron, until I finally tried the code example in the ADSK Maya documentation, which FAILS. Let’s first look at the -vc flag, which is required to load using ‘bilinear’ or ‘barycentric’ mapping/extrapolation:

cmds.deformerWeights ("testWeights.xml", ex=True, vc=True, deformer="skinCluster1")
 
# Error: Invalid flag 'vc'
# Traceback (most recent call last):
#   File "<maya console>", line 1, in <module>
# TypeError: Invalid flag 'vc' #

Gotcha 4) The python examples do not work. -vertexConnections flag doesn’t work, -attribute flag doesn’t work, so no saving skincluster metadata like ‘skinningMethod’, etc. Because of that, ‘barycentric’ and other methods that need vertex connection info do not work. The ‘deformer’ flag shows that it takes a list of deformers and writes them all to one file, but this is not true, it takes a single string name of a deformer.

I now know why the UI doesn’t have all these cool options! –they don’t work!

Gotcha 5) It doesn’t take a file path, to save a file to a path you need to specify the filename, and then the path separate.

cmds.deformerWeights ("testWeights.xml", path='d:\\myWeight\\export\\folder\\', ex=True, deformer="skinCluster1")

Perhaps someone fixed this stuff, documented it, and then reverted the fix, but this has been around since 2011.. I tried the above in maya 2016 latest service pack and all my links above are to that version of the documentation.

I wasn’t really intending to write this much, so now that we know this can import weights 125 times faster, we’ll make a tool to utilize it. Stay tuned!

posted by Chris at 2:15 AM  

Thursday, October 16, 2014

Tracing and Visualizing Driven-Key Relationships

sdk

Before I get into the collosal mess that is setting driven keys in Maya, let me start off by saying, when I first made an ‘SDK’ in college, back in 1999, never did I think I would still be rigging like this 15 years later. (Nor did I know that I was setting a ‘driven key’, or a ‘DK’ which sounds less glamorous)

How The Mess is Made

simple

Grab this sample scene [driven_test]. In the file, a single locator with two attributes drives the translation and rotation of two other locators. Can’t get much ismpler than that, but look at this spaghetti mess above! This simple driven relationship created 24 curves, 12 blendWeighted nodes, and 18 unitConversion nodes. So let’s start to take apart this mess. When you set a driven-key relationship, it uses an input and a curve to drive another attribute:

curves2

When you have multiple attributes driving a node, maya creates ‘blendWeighted’ nodes, this blends the driven inputs to one scalar output, as you see with the translateX below:

curves

Blending scalars is fairly straight forward, but for rotations, get ready for this craziness: A blendWeighted node cannot take the output of an animCurveUA (angle output), the value must first be converted to radians, then blended. But the final node cannot take radians, so the result must be converted back to an euler angle. This happens for each channel.

craziness

If you think this is retarded; welcome to the club. It is a very cool usage of general purpose nodes in Maya, but you wouldn’t think so much of rigging was built on that, would you? That when you create a driven-key it basically makes a bunch of nodes and doesn’t track an actual relationship, because of this, you can’t even reload a relationship into the SDK tool later to edit! (unless you traverse the spaghetti or takes notes or something)

I am in love with Node Edtor, but by default hypergraph did hide some of the spaghetti, it used to hide unitConversions as ‘auxiliary nodes’:

auxnode

Node Editor shows unitConversions regardless of whether aux nodes are enabled, I would rather see too much and know what’s going on than have things hidden, but maybe that’s just me. You can actually define what nodes are considered aux nodes and whether ‘editors’ show them, but I am way off on a tangent here.

So just go in there and delete the unit conversion yourself and wire the euler angle output, which you would think is a float.. into the blendWeighted input, which takes floats. Maya won’t let you, it creates the unitConversion for you because animCurveUA outputs angles, not floats.

This is why our very simple example file generated over 50 nodes. On Ryse, Maruis’ face has about 73,000 nodes of driven-key spaghetti. (47,382 curves,  1,420 blendWeighted, 24,074 unitConversion)

Finding and traversing

So how do we find this stuff and maybe query and deal with it? Does Maya have some built in way of querying a driven relationship? No. Not that I have ever found. You must become one with the spaghetti! setDrivenKeyframe has a query mode, but that only tells you what ‘driver’ or ‘driven’ nodes/attrs are in the SDK window if it’s open, they don’t query driver or driven relationships!

We know that these intermediate nodes that store the keys are curves, but they’re a special kind of curve, one that doesn’t take time as an input. Here’s how to search for those:

print len(cmds.ls(type=("animCurveUL","animCurveUU","animCurveUA","animCurveUT")))

So what are these nodes? I mentioned above that animCurveUA puts out an angle:

  • animCurveUU – curve that takes a double precision float and has a double output
  • animCurveUA – takes a double and outputs an angle
  • animCurveUL – takes a double and outputs a distance (length)
  • animCurveUT – takes a double and outputs a time

When working with lots of driven-key relationships you frequently want to know what is driving what, and this can be very difficult because of all the intermediate node-spaghetti. Here’s what you often want to know:

  • What attribute is driving what – for instance, select all nodes an attr drives, so that you can add them back to the SDK tool. ugh.
  • What is being driven by an attribute

I wrote a small script/hack to query these relationships, you can grab it here [drivenKeyVisualizer]. Seriously, this is just a UI front end to a 100 line script snippet, don’t let the awesomeness of QT fool you.

dkv1

The way I decided to go about it was:

  1. Find the driven-key curves
  2. Create a tiny curve class to store little ‘sdk’ objects
  3. List incoming connections (listConnections) to get the driving attr
  4. Get the future DG history as a list and reverse it (listHistory(future=1).reverse())
  5. Walk the reversed history until I hit a unitConversion or blendWeighted node
  6. Get it’s outgoing connection (listConnections) to find the plug that it’s driving
  7. Store all this as my sdk objects
  8. Loop across all my objects and generate the QTreeWidget

Here’s how I traversed that future history (in the file above):

 #search down the dag for all future nodes
 futureNodes = [node for node in cmds.listHistory(c, future=1, ac=1)]
 #reverse the list order so that you get farthest first
 futureNodes.reverse()
 drivenAttr = None
 
 #walk the list until you find either a unitConversion, blendWeighted, or nothing
 for node in futureNodes:
     if cmds.nodeType(node) == 'unitConversion':
         try:
             drivenAttr = cmds.listConnections(node + '.output', p=1)[0]
             break
         except:
             cmds.warning('blendWeighted node with no output: ' + node)
             break
     elif cmds.nodeType(node) == 'blendWeighted':
         try:
             drivenAttr = cmds.listConnections(node + '.output', p=1)[0]
             break
         except:
             cmds.warning('blendWeighted node with no output: ' + node)
             break
 if not drivenAttr:
     drivenAttr = cmds.listConnections(c + '.output', p=1)[0]
 if drivenAttr:
     dk.drivenAttr = drivenAttr
 else:
     cmds.warning('No driven attr found for ' + c)

This of course won’t work if you have anything like ‘contextual rigging’ that checks the value of an attr and then uses it to blend between two banks of driven-keys, but because this is all general DG nodes, as soon as you enter nodes by hand, it’s no longer really a vanilla driven-key relationship that’s been set.

If you have a better idea, let me know, this above is just a way I have done it that has been robust, but again, I mainly drive transforms.

 What can you do?

Prune Unused Pasta

pruned

Pruned version of the driven_test.ma DAG

By definition, when rigging something with many driven transforms like a face, you are creating driven-key relationships based on what you MIGHT need. This goes for when making the initial relationship, or in the future when you maybe want to add detail. WILL I NEED to maybe translate an eyelid xform to get a driven pose I want.. MAYBE.. so you find yourself keying rot/trans on *EVERYTHING*. That’s what I did in my example, and the way the Maya SDK tool works, you can’t really choose which attrs per driven node you want to drive, so best to ‘go hunting with a shotgun’ as we say. (shoot all the trees and hope something falls out)

Ok so let’s write some code to identify and prune driven relationships we didn’t use.

CAUTION: I would only ever do this in a ‘publish’ step, where you take your final rig and delete crap to make it faster (or break it) for animators. Also, I have never used this exact code below in production, I just created it while making this blog post as an example. I have run it on some of our production rigs and haven’t noticed anything terrible, but I also haven’t really looked. 😀

def deleteUnusedDriverCurves():
    for driverCurve in cmds.ls(type=("animCurveUL","animCurveUU","animCurveUA","animCurveUT")):
        #delete unused driven curves
        if not [item for item in cmds.keyframe(driverCurve, valueChange=1, q=1) if abs(item) &gt; 0.0]:
            cmds.delete(driverCurve)
 
deleteUnusedDriverCurves()

This deletes any curves that do not have a change in value. You could have multiple keys, but if there’s no curve, let’s get rid of it. Now that we have deleted some curves, we have some blendWeighted nodes that now aren’t blending anything and unitConversions that are worthless creatures. Let’s take care of them:

def deleteUnusedBlendNodes():
    #rewire blend nodes that aren't blending anything
    for blendNode in cmds.ls(type='blendWeighted'):
        if len(cmds.listConnections(blendNode, destination=0)) == 1:
            curveOutput = None
            drivenInput = None
 
            #leap over the unitConversion if it exists and find the driving curve
            curveOutput = cmds.listConnections(blendNode, destination=0, plugs=1, skipConversionNodes=1)[0]
            #leap over the downstream unitConversion if it exists
            conns = cmds.listConnections(blendNode, source=0, plugs=1, skipConversionNodes=1)
            for conn in conns:
                if cmds.nodeType(conn.split('.')[0]) == 'hyperLayout': conns.pop(conns.index(conn))
            if len(conns) == 1:
                drivenInput = conns[0]
            else:
                cmds.warning('BlendWeighted had more than two outputs? Node: ' + blendNode)
 
            #connect the values, delete the blendWeighted
            cmds.connectAttr(curveOutput, drivenInput, force=1)
            cmds.delete(blendNode)
            print 'Removed', blendNode, 'and wired', curveOutput, 'to', drivenInput
 
deleteUnusedBlendNodes()

We find all blendWeighted nodes with only one input, then traverse out from them and directly connect whatever it was the node was blending, then we delete it. This is a bit tricky and I still think I may have missed something because I wrote this example at 2am, but I ran it on some rigs and haven’t seen an issue.

Here are the results running this code on an example rig:

pruned_graph

Create a Tool To Track / Mirror / Select Driven Relationships

This is a prototype I was working on at home but shelved, I would like to pick it up again when I have some time, or would be open to tossing it on github if people would like to help. It’s not rocket science, it’s besically what Maya should have by default. You just want to track the relationships you make, and also select all nodes driven by an attr. Also mirror their transforms across an axis (more geared toward driven transforms).

sdkWrangler

Write Your Own Driver Node

Many places create their own ‘driven node’ that just stores driven relationships. Judd Simantov showed a Maya node that was used on Uncharted2 to store all facial poses/driven relationships:

facePoseNode

The benefits of making your own node are not just in DAG readability, check out the time spent evaluating all these unitConversion and blendWeighted nodes in a complex facial rig (using the new Maya 2015 EXT 1 Profiler tool) –that’s over 760ms! (click to enlarge)

profiler

Though it’s not enough to make a node like this, you need to make a front end to manage it, here’s the front end for this node:

poseFaceUI

Give Autodesk Feedback!

feedback

As the PSD request is ‘under review’, maybe when they make the driver, they can make a more general framework to drive things in Maya.

Conclusion

As you can see, there are many ways to try to manage and contain the mess generated by creating driven-key relationships.  I would like to update this based on feedback, it’s definitely not an overview, and speaks more to people who have been creating driven-key relationships for quite some time.  Also, if you would find a tool like my Maya SDK replacement useful, let me know, especially if you would like to help iron it out and/or test it.

posted by Chris at 3:16 PM  

Tuesday, September 30, 2014

Why Storing String Refs is Dangerous and Irresponsible

Yes! Definitely a clickbait title if there ever was one; but this is important! Some of you contacted me regarding my earlier post (Don’t Use String Paths), where I said you should never use string names to keep track of anything even vaguely important in Maya.

This problem is so fundamental in Maya that the initial Python code test I came up with for the Crytek Technical Art Dept used to be a simple maya node renamer. No joke.

THE PROBLEM

From time to time I see code that attempts reach out into the DAG and grab nodes by concatenating tokens like:

character_side + '_' + character_name + '_arm_' + UID + '_' + type

This is SUPER dangerous. You are basically guessing that an object exists, and betting your whole tool or codebase on this, it’s super fragile.

Let’s use the example of making a turtle, let’s call him ‘Red’, he’s red, and his shell is soft:

cmds.joint(name = 'red' + '_' + shell_hardness + '_' + animal_type + '_hand')
cmds.select('red' + '_' + shell_hardness + '_' + animal_type + '_hand')
# Error: No object matches name: red_soft_turtle_hand
# Traceback (most recent call last):
#   File "", line 1, in 
# ValueError: No object matches name: red_soft_turtle_hand #

First up, you should *never* do this, when you are creating a node with a name you are making from scratch, you *must* first check if it exists. If it exists, Maya will alter the name and you will not be able to find it, your code will immediately break either with the above error, or this one:

cmds.select('red_soft_turtle_hand')
# Error: More than one object matches name: red_soft_turtle_hand
# Traceback (most recent call last):
#   File "", line 1, in 
# ValueError: More than one object matches name: red_soft_turtle_hand #

SLIGHTLY BETTER

So here’s something a bit more safe, but still not recommended in situations where this is important:

hand_jnt = cmds.joint(name = 'red' + '_' + shell_hardness + '_' + animal_type + '_hand')
print hand_jnt
# >>: red_soft_turtle_hand1

Here, we’re storing the node created in a variable, if the name is not the name we expected, we still know how to find the node. This is a lot safer, your code will continue to run, but it’s also not a great way of working. Maya created our joint, but called it ‘red_soft_turtle_hand1’, but, because we stored the node returned from the command creating it into a variable, we can print hand_jnt, and it will return ‘red_soft_turtle_hand1’.

To be super clear, this is more safe because:

  • Maya is resolving any name clashes for you automatically
  • You get the *real* name returned to you from Maya upon node creation
  • If you create a node name that exists elsewhere, it returns you a full path automatically

This is somewhat acceptable in code that’s building a rig. Wham! Bam! You created a node and then did something with it seconds later and never looked back!

STILL A PROBLEM

So let’s say you’re doing the slightly safer way, and you’re storing long paths of nodes which Maya gives you the name of. As soon as you store a long path, it’s stale.  This is what I meant above, the longer you store this information, the less reliable it is.

Let’s look at our joint, its long path is:

|root|pelvis|shell|some_other_joint|arm1|arm2|red_soft_turtle_hand

If *any* of the six parent nodes names change, just a single character! You’re dead in the water. If the hierarchy changes: you’re dead in the water.

If you’re working with someone who defends the above by saying the following

  • “Oh, the hierarchy will never change”
  • “Oh, there will never be a node with the same name”
  • “Oh, no one will ever rename any of these”

The Maya DAG is the wild west.
You WILL have duplicate node names.
You WILL have hierarchy changes.
Professional tools don’t only work with a bunch of caveats,
if it’s a valid Maya scene, your code should work with it:
BE PREPARED.

THE SOLUTIONS

There are clear ways to overcome the challenge above, they’re not secrets, they are actually the professional way Autodesk tells you to do it in the docs, code examples, and their own implementations.

You don’t *have* to work 100% in the API or PyMel, but like we said before, as soon as possible get a pointer to your object. Think of any string path as having a short half-life.

Using The Maya Python API

In C++ when you pass around an object, you have a pointer to it’s location in memory. The name and DAG path can change, but you can at any time get the current name, and path. Fresh, not stale!

import maya.OpenMaya as om
m_dg = om.MFnDagNode()
m_obj = m_dg.create("joint")
m_dagPath = om.MDagPath()
 
if m_obj.hasFn(om.MFn.kDagNode):
    om.MDagPath.getAPathTo( m_obj, m_dagPath )
    print m_dagPath.fullPathName()
# >>: |joint1

Using PyMel

PyMel wraps the API, a PyMel object is a *real* python object that stores the actual MObject, but you don’t have to use the API.

myJoint = joint(name='doesnt_even_matter')
print myJoint.fullPath()
# >>: |root|pelvis|shell|some_other_joint|arm1|arm2|red_soft_turtle_hand|doesnt_even_matter
#In case you never used PyMel, here's some examples of convenience functions:
myJoint.transformationMatrix()
myJoint.inputs()

Notice that PyMel is handing you back python objects, you can ask the object for it’s full path at any time, and it will be fresh data.

Using Message Attrs

Message attributes are how Alias decided users will serialize relationships between nodes. I have removed this section because future-me wrote an entire post dedicated to this (The Mighty Message Attribute).

MAKING A PLAN

The important thing here is that you decide a consistent way of using the above. At Crytek we tried to have all core functions that accepted or passed DG nodes, do the handoff as MObjects. We serialized all important relationships with message attrs, and when there was too much data for that to be efficient, we stamped nodes with metadata.

RETROFITTING

If you have an existing pipeline where you build a lot of string references by concatenating tokens like the example above, you can make a convenience function that will validate your assumptions and deal gracefully with issues. Something like my_utils.get_node(‘my’ + ‘_’ + ‘thing’)

posted by Chris at 3:28 PM  

Wednesday, September 24, 2014

Maya DAG nodes in QT tools (don’t use string paths)

fragile


String paths to Maya objects are _fragile_. This data is stale as soon as you receive it, long paths are better than short, and taking into account namespaces is even better –BUT when it comes down to it, the data is just old as soon as you get it, and there is a better way.

A Full Path that is Never Stale

If you store a node in a Maya Python API MDagPath object, you can ask at any time and get its full path. Because it’s basically a pointer to the object in memory. Here’s an example:

import maya.OpenMaya as om
 
#create and populate an MSelectionList
sel = om.MSelectionList()
sel.add(cmds.ls(sl=1)[0])
 
#create and fill an MDagPath
mdag = om.MDagPath()
sel.getDagPath(0, mdag)
 
#At any time request the current fullpath to the node
print mdag.fullPathName()

CHALLENGE: Can you write a renaming tool that doesn’t use string path node representation? That works with all DG nodes? Without using PyMel? 😉

Embedding Maya Python Objects in PyQT (UserRole)

So.. if we can store a pointer to an object, how do we track that with QT UIs, pass it around, etc? It can be really difficult to find a way to be responsible here, you have all these lists and node representations, and in the past I would try to sync lists of python MDagPath objects, or make a dictionary that mirrors the listView… but there is a way to store arbitrary python objects on list and tree widgetitems!

In this code snipet, I traverse a selection and add all selected nodes to a list, I add ‘UserRole’ data to each and set that data to be an MDagPath:

    listWids = []
    for item in nodes:
        sel = om.MSelectionList()
        sel.add(item)
        mdag = om.MDagPath()
        sel.getDagPath(0, mdag)
        name = mdag.fullPathName()
        if not self.longNamesCHK.isChecked():
            name = name.split('|')[-1]
        wid = QtGui.QListWidgetItem(listWid)
        wid.setText(name)
        wid.setData(QtCore.Qt.UserRole, mdag)
        listWids.append(wid)

Now, later when we want to get the full path name of this widgetItem, we just ask it for this data. That returns the MDagPath object, and we can ask the object for the current full path to the node:

print self.drivenNodeLST.currentItem().data(QtCore.Qt.UserRole).fullPathName()

So this is a good way to have arbitrary data that travels wit the QT node description, which is usually some kind of widget.

posted by Chris at 12:40 PM  

Sunday, May 11, 2014

Maya: Vector Math by Example

BEFORE WE BEGIN

This post is about how to use vector math and trigonometric functions in Maya, it is not a linear algebra or vector math course, it should give you what you need to follow along in Maya while you learn with online materials. Kahn Academy is a great online learning resource for math, and Mathematics for Computer Graphics, and Linear Algebra and its Applications are very good books. Gilbert Strang, the Author of Linear Algebra, has his entire MIT Linear Algebra course lectures here in video form. Also, Volume 2 of Complete Maya Programming has some vector math examples in MEL and C++.

vector_wikipedia

VECTORS

Think of the white vector above as a movement. It does have three scalar values (ax, ay, az), sure, but do not think of a vector as a point or a position. When you see a vector, I believe it helps to imagine it as a movement from 0,0,0 – an origin. We don’t know where it started, we only know the movement.

A vector has been normalized, or is considered a unit vector, when it’s length is one. This is achieved by dividing each component by the length.

VECTOR LIBRARIES

There are many Python libraries dedicated to vector math, but none ship with Python itself. I have tried numPy, then pyEuclid, and finally piMath. It can definitely be a benefit to load the same vector class across multiple apps like Maya, MotionBuilder, etc.. But, I used those in a time when MotionBuilder had no vector class, and before Maya had the API. Today, I use the vector class built into the Maya Python API (2.0), which wraps the underlying Maya C++ code: MVector

I had to call out 2.0 above, as those of you using the old API, you have to ‘cast’ your vectors to/from, meaning that classes like MVector (Maya’s vector class) don’t accept python objects like lists or tuples, this is still the case with the 2014 SWIG implementation of the default API, but not API 2.0. One solution is to override the MVector class in a way that it accepts a Python lists and tuples, essentially automatically casting it for you:

class MVector(om.MVector):
    def __init__(self, *args):
        if( issubclass, args, list ) and len(args[0])== 3:
            om.MVector.__init__(self, args[0][0], args[0][1], args[0][2])
        else:
            om.MVector.__init__(self, args)

But that aside, just use Maya Python API 2.0:

#import API 2.0
import maya.api.OpenMaya as om
#import old API
import maya.OpenMaya as om_old


CREATING VECTORS IN MAYA

Let’s first create two cubes, and move them

import maya.cmds as cmds
import maya.api.OpenMaya as om
cube1, cube2 = cmds.polyCube()[0], cmds.polyCube()[0]
cmds.xform(cube2, t=(1,2,3))
cmds.xform(cube1, t=(3,5,2))

Let’s get the translation of each, and store those as MVectors

t1, t2 = cmds.xform(cube1, t=1, q=1), cmds.xform(cube2, t=1, q=1)
print t1,t2
v1, v2 = om.MVector(t1), om.MVector(t2)
print v1, v2

This will return the translation in the form [x, y, z], and also the MVector, which will print: (x, y, z), and in the old API: <__main__.MVector; proxy of <Swig Object of type ‘MVector *’ at 0x000000002941D2D0> >. This is a SWIG wrapped C++ object, API 2.0 prints the vector.

Note: I just told you to think of vectors as a movement, and not as a position, and the first example I give stores translation in a vector. Maybe not the best, but remember this translation, is really being stored as a movement in space from an origin.

So let’s start doing stuff and things.
 

LENGTH / DISTANCE / MAGNITUDE

We have two translations, both stored as vectors, let’s get the distance between them, to do this, we want to make a new vector that describes a ray from one location to the other and then find it’s length, or magnitude. To do this we subtract each component of v1 from v2:

v = v2-v1
print v

This results in ‘-2.0 -3.0 1.0’.

To get the length of the vector we actually get the square root of the sum of x,y,and z squared sqrt(x^2+y^2+z^2), but as we haven’t covered the math module yet, let’s just ask the MVector for the ‘length’:

print om.MVector(v2-v1).length()

This will return 3.74165738677, which, if you snap a measure tool on the cubes, you can verify:

distance

Use Case: Distance Check

As every joint in a hierarchy is in it’s parent space, a joint’s ‘magnitude’ is it’s length. Let’s create a lot of joints, then select them by joint length.

import maya.cmds as cmds
import random as r
import maya.api.OpenMaya as om
 
root = cmds.joint()
jnts = []
 
for i in range(0, 2000):
    cmds.select(cl=1)
    jnt = cmds.joint()
    trans = (r.randrange(-100,100), r.randrange(-100,100), r.randrange(-100,100))
    cmds.xform(jnt, t=trans)
    jnts.append(jnt)
 
cmds.parent(jnts, root)

joint_dist

So we’ve created this cloud of joints, but let’s just select those joints with a joint length of less than 50.

sel = []
for jnt in jnts:
    v = om.MVector(cmds.xform(jnt, t=1, q=1))
    if v.length() < 50: sel.append(jnt)
 
cmds.select(sel)


DOT PRODUCT / ANGLE BETWEEN TWO VECTORS

The dot product is a scalar value obtained by performing a specific operation on two vector components. This doesn’t make much sense, so I will tell you that the dot product is extremely useful in finding the angle between two vectors, or checking which general direction something is pointing.

dot = v1*v2
print dot

USE CASE: Direction Test

direction

The dot product of two normalized vectors will always be between -1.0 and 1.0, if the dot product is greater than zero, the vectors are pointing in the same general direction, zero means they are perpendicular, less than zero means opposite directions. So let’s loop through our joints and select those that are facing the x direction:

sel = []
for jnt in jnts:
    v = om.MVector(cmds.xform(jnt, t=1, q=1)).normal()
    dot = v*om.MVector([1,0,0])
    if dot > 0.7: sel.append(jnt)
cmds.select(sel)

USE CASE: Test World Colinearity

This one comes from last week in the office, one of my guys wanted to know how to check which way in the world something was facing. I believe it was to derive some information from arbitrary skeletons. This builds on the above by getting each vector of a node in world space.

def getLocalVecToWorldSpace(node, vec=om.MVector.kXaxisVector):
    matrix = om.MGlobal.getSelectionListByName(node).getDagPath(0).inclusiveMatrix()
    vec = (vec * matrix).normal()
    return vec
 
 
def axisVectorColinearity(node, vec):
    vec = om.MVector(vec)
 
    x = getLocalVecToWorldSpace(node, vec=om.MVector.kXaxisVector)
    y = getLocalVecToWorldSpace(node, vec=om.MVector.kYaxisVector)
    z = getLocalVecToWorldSpace(node, vec=om.MVector.kZaxisVector)
 
    #return the dot products
    return {'x': vec*x, 'y':vec*y, 'z':vec*z}
 
jnt = cmds.joint()
print axisVectorColinearity(jnt, [0,0,1])

You can rotate the joint around and you will see which axis is most closely pointing to the world space vector you have given as an input.

USE CASE: Angle Between Vectors

angle

When working with unit vectors, we can get the arc cosine of a dot product to derive the angle between the two vectors, but this requires trigonometric functions, which are not available in our vector class, for this we must import the math module. Scratching the code above, let’s find the angle between two joints:

import maya.cmds as cmds
import maya.api.OpenMaya as om
import math
 
jnt1 = cmds.joint()
cmds.select(cl=1)
jnt2 = cmds.joint()
cmds.xform(jnt2, t=(0,0,10))
cmds.xform(jnt1, t=(10,0,0))
cmds.select(cl=1)
root = cmds.joint()
cmds.parent([jnt1, jnt2], root)
 
v1 = om.MVector(cmds.xform(jnt1, t=1, q=1)).normal()
v2 = om.MVector(cmds.xform(jnt2, t=1, q=1)).normal()
 
dot = v1*v2
print dot
print math.acos(dot)
print math.acos(dot) * 180 / math.pi

So at the end here, the arc Cosine of the dot product returns the angle in radians (1.57079632679), which we convert to degrees by multiplying it by 180 and dividing by pi (90.0). To check your work, there is no angle tool in Maya, but you can create a circle shape and set the sweep degrees to your result.

Now that you know how to convert radians to an angle, if you store the result of the above in an MAngle class, you can ask for it however you like:

print om.MAngle(math.acos(dot)).asDegrees()

Now that you know how to do this, there is an even easier, using the angle function of the MVector class, you can ask it the angle given a second vector:

print v1.angle(v2)

There are also useful attributes v1.rotateBy(r,r,r) for an offset and v1.rotateTo(v2). I say (r,r,r) in my example, but the rotateBy attr takes angles or radians.

CHALLENGE: Can you write your own rad_to_deg and deg_to_rad utility methods?

USE CASE: Orient-Driver

poseDriver
Moving along, let’s apply these concepts to something more interesting. Let’s drive a blendshape based on orientation of a joint. Since the dot product is a scalar value, we can pipe this right into a blendshape, when the dot product is 1.0, we know that the orientations match, when it’s 0, we know they are perpendicular.

vecPoseDriver

We will use a locator constrained to the child to help in deriving a vector. The fourByFourMatrix stores the original position of the locator. I tried using the holdMatrix node, which should store a cached version of the original locator matrix, but it kept updating. (?) We use the vectorProduct node in ‘dot product’ mode to get the dot product of the original vector and the current vector of the joint. We then pipe this value into the weight of the blendshape node.

Now, this simple example doesn’t take twist into account, and we aren’t setting a falloff or cone, the falloff will be 1.0 when the vectors align and the blendshape is on 100% and 0.0, when they’re perpendicular and the blendshape will be on 0%. I also don’t clamp the dot product, so the blendshape input can go to -1.
 

CROSS PRODUCT / PERPENDICULAR VECTOR TO TWO VECTORS

The cross product results in a vector that is perpendicular to two vectors. Generally you would do (v1.y*v2.z-v1.z*v2.y, v1.z*v2.x-v1.x*v2.z, v1.x*v2.y-v1.y*v2.x), ut luckily, the vector class manages this for us by using the ‘^’ symbol:

cross = v1^v2
print cross

USE CASE: Building a coordinate frame

crossProduct

If we get the cross product of v1^v2 above, and use this vector to now cross (v1 x v2)x v1, we will now have a third perpendicular vector to build a coordinate system or ‘orthonormal basis’. A useful example would be aligning a node to a nurbs curve using the pointOnCurveInfo node.

crossProduct

In the example above, we are using two cross products to build a matrix from the tangent of the pointOnCurveInfo and it’s position, then decomposing this matrix to set the orientation and position of a locator.


Many people put content like this behind a paywall.
If you found this useful, please consider buying me a beer.

posted by Chris at 11:49 PM  

Sunday, January 6, 2013

My 2012 in Review

2012 blew by incredibly fast. If I had to sum the year up into three categories it would be:

  • RYSE / CINEBOX: At Crytek, for the first time ever I broke away from the Crysis franchise and have been working on Ryse with my old friend Hanno Hagedorn, who returned to Crytek this year. In my ‘20% time’ I am still on CINEBOX, which saw some of it’s first production use this year on some high profile film and game projects, but I can’t say much more than that.
  • MAYA: New project, new team, and new software/pipeline! I mentioned this in my SIGGRAPH class, which cleared PR, so no issue mentioning it here: Ryse is the first Maya project at Crytek. In the past year, with the help of Crytek UK, we have been building up a Maya pipeline from scratch. The 3dsMax pipeline was ~10 years old and had a lot of legacy stuff.  Any Maya studio I have worked at always had a legacy pipeline, and I had a mental checklist of things we all would have done differently ‘if we could rewrite everything’. It has been really fun working with the Ryse TechArt team to build this pipeline, we have some really great guys (and gal!), but I won’t out them here. (to the dismay of recruiters everywhere)
  • DIVING: This year I spent a lot more time in the water! Not only diving, but I stepped up my photography; nothing raises your pulse like a changing lenses out over a 200m dropoff! Colleen and I were lucky enough to get to Indonesia, Malaysia, and Egypt. (video, photos) We stayed on an old oil rig off Sipadan where we met a group of great photographers, one of which was Sin Hwa, who took that photo of me above.
posted by admin at 2:27 AM  

Saturday, April 21, 2012

Maya: Walking the Line

I am still finding my feet in Maya, on my project, some files have grown to 800mb in size. Things get corrupt, hand editing MAs is common; I am really learning some of the internals.

In the past week I have had to do a lot of timeline walking to switch coord spaces and get baked animations into and out of hierarchies. In 3dsMax you can do a loop and evaluate a node ‘at time i’, and there is no redraw or anything. I didn’t know how to do this in Maya.

I previously did this with looping cmds.currentTime(i) and ‘walking the timeline’, however, you can set the time node directly like so: cmds.setAttr(“time1.outTime”, int(i))

Unparenting a child with keyed compensation (1200 frames)
10.0299999714 sec – currentTime
2.02 sec – setAttr

There are some caveats, whereas in a currentTime loop you can just cmds.setKeyframe(node), I now have to cmds.setKeyframe(node, time=i). But when grabbing a matrix, I don’t need to pass time and it works, I don’t think you can anyway.. I guess it gets time from the time node.

Here’s a sample loop that makes a locator and copies a nodes animation to world space:

#function feeds in start, end, node
	if not start: start = cmds.playbackOptions(minTime=1, q=1)
	if not end: end = cmds.playbackOptions(maxTime=1, q=1)
	loc = cmds.spaceLocator(name='parentAlignHelper')
	for i in range(start, (end+1)):
		cmds.setAttr("time1.outTime", int(i))
		matrix = cmds.xform(node, q=1, ws=1, m=1)
		cmds.xform(loc, ws=1, m=matrix)
		cmds.setKeyframe(loc, time=i)
posted by admin at 11:44 AM  

Wednesday, April 7, 2010

RigPorn: Uncharted 2

My friends Judd and Rich gave a talk on some of the Character Tech behind Uncharted 2. Here are the slides.

posted by admin at 8:32 PM  

Wednesday, July 8, 2009

Buggy Camera Issues In Maya on x64

Many, many people are having weird, buggy camera issues where you rotate a view and it snaps back to the pre-tumbled state (view does not update properly). There are posts all over, and Autodesk’s official response is “Consumer gaming videocards are not supported”. Really? That’s basically saying: All consumer video cards, gaming or not, are unsupported. I have had this issue on my laptop, which is surely not a ‘gaming’ machine. Autodesk says the ‘fix’ is to upgrade to an expensive pro-level video card. But what they maybe would tell you if they weren’t partnered with nVidia is: It’s an easy fix!

Find your Maya ENV file:

C:\Documents and Settings\Administrator\My Documents\maya\2009-x64\Maya.env

And add this environment variable to it:

MAYA_GEFORCE_SKIP_OVERLAY=1

Autodesk buried this information in their Maya 2009 Late Breaking Release Notes, and it fixes the issue completely! However, even on their official forum, Autodesk employees and moderators reply to these draw errors as follows:

Maya 2009 was tested with a finite number of graphics cards from ATI and Nvidia, with drivers from each vendor that provided the best performance, with the least amount of issues. (at the time of product launch).  A list of officially qualified hardware can be found here: http://www.autodesk.com/maya-hardware. Maya is not qualified/supported on consumer gaming cards.  Geforce card users can expect to have issues.  This is clearly stated in the official qualification charts mentioned above.

posted by admin at 10:43 AM  

Sunday, October 19, 2008

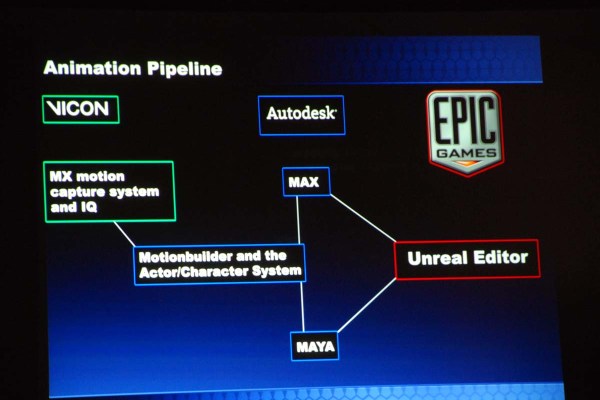
Epic Pipeline Presentation

I saw this presentation about a year ago, talking about the pipeline Epic uses on their games. Maybe some interesting stuff for others here. The images are larger, you can right click -> view image to see a larger version.

45 days or more to create a single character… wow.

They don’t use polycruncher to generate LODs, they do this by hand. They just use it to import the mesh into max in a usable form from mudbox/zbrush.

They don’t care so much about intersecting meshes when making the high res, as it’s just used to derive the nMap, not RP a statue or anything.

They said they only use DeepUV for it’s ‘relax’ feature. They make extensive use of the 3DS Max ‘render to texture’ as well.

Their UT07 characters are highly customizable. Individual armor parts can be added or removed, or even modded. Their UV maps are broken down into set sections that can be generated on the fly. So there are still 2×2048 maps but all the maps can be very different. This is something I have also seen in WoW and other games.

They mentioned many times how they use COLLADA heavily to go between DCC apps.

They share a lot of common components accross characters

posted by Chris at 4:44 PM  

Powered by WordPress